
Preparing a Car for Living
To prepare a car for living, measure the usable sleeping space, build a stable layout that keeps exits and controls clear, plan airflow, water, hygiene, waste and essential-device charging, then test the whole setup before relying on it. The workable arrangement depends on your vehicle's interior geometry, the weather, access to facilities and your daily needs.

Four-stage preparation plan
From an empty car to a tested living setup
Work through these checks in order. Tick an item only when you have verified it in your actual vehicle; the result tracks checks completed, not a safety certification.
-
Measure the usable car
If not: change the proposed footprint before buying or fitting more equipment.
-
Fit sleeping and storage
If not: move the conflicting item or reconsider the layout when fixed geometry prevents safe access.
-
Plan daily essentials
If not: revise the missing service or its contingency before relying on the setup.
-
Trial, correct and retest
If not: treat the untested or failing condition as unresolved rather than assuming the setup is ready.
A completed checklist is not permission to sleep or park in a location, nor proof of safety in every condition. Recheck the vehicle when its layout, weather, location or routine changes.
Sleeping and storage compete for space. An arrangement that fits physically may still obstruct an exit, interrupt airflow or make a needed item unreachable; climate and daily routines can also change how well it works. Assess the car's actual constraints first, then adjust and test the combined setup rather than treating each item independently.
Table of Contents
Check the Car's Usable Space and Setup Constraints
The car must be assessed for what its usable space and operating layout can physically support before any sleeping or storage arrangement is fixed.
A workable setup needs enough interior clearance for the planned use while preserving access to doors, exits, controls, ventilation openings, and charging access.
Seat position, folding geometry, and existing obstructions can impose hard setup constraints, while the placement of movable items is usually more adjustable.
These observations define the vehicle's practical limits without establishing a universal pass-or-fail standard.

Separate hard constraints from adjustable preferences before changing the layout.
The following criteria connect each observable vehicle condition to the setup implication it creates, moving from physical space toward operational access.
- Usable space: Check whether the available interior area remains usable with the seats in the intended position. Seats that do not fold flat, fixed consoles, wheel arches, or other permanent shapes can limit where sleeping and storage functions can be placed.
- Seat position and clearance: Observe how seat backs, head restraints, and the normal driving position affect the available space. If the planned layout requires a seat position that obstructs controls or necessary access, the layout requires adjustment.
- Door and hatch access: Check whether doors and the hatch can still open and whether the intended layout leaves a usable path through them. A setup that physically fits but restricts entry or causes stored items to block an opening creates an operational constraint.
- Ventilation potential: Observe which windows or other existing openings remain usable without obstruction from bedding or storage. Limited window opening or blocked airflow paths reduces the ventilation options available to the later setup.
- Charging access: Identify which existing charging points remain physically reachable once the interior is arranged. If storage or sleeping equipment blocks a charging point or forces cable routing across movement paths, the setup requires a different placement strategy.
- Controls and exits: Confirm that essential vehicle controls and intended exits remain unobstructed in both daytime and sleeping configurations. Any fixed or movable item that blocks them creates an operational conflict that should be resolved before relying on the layout.
The most consequential setup constraints are usually fixed conditions that cannot be corrected simply by moving storage, such as seats that remain sloped, restricted door access, limited window opening, or poorly positioned charging access.
Preferences such as which side holds frequently used items can usually change around those limits, but the practical result still depends on the planned layout and daily-use needs.
A layout can therefore fit the interior yet remain impractical if it obstructs access, airflow, controls, or device power.
Use actual measurements and observations from the specific car, rather than assumptions about exterior size or nominal capacity, before deciding what the setup can support.
Measure the Usable Sleeping and Storage Space
Measure the car interior in the configuration actually intended for sleeping and storage, not from exterior size or nominal cargo capacity alone.
Record the sleeping length, usable width, and vertical clearance with the seats, bedding, and other fixed elements in their expected positions.
These usable dimensions show what space is physically available before deciding whether the sleeping surface and accessible storage can coexist.
There is no single minimum sleeping length, width or headroom that fits every person and vehicle. Use the measurements of the actual sleeping position—with seats and bedding deployed—to confirm that the sleeper can lie down, move normally and reach the intended exit without obstruction.
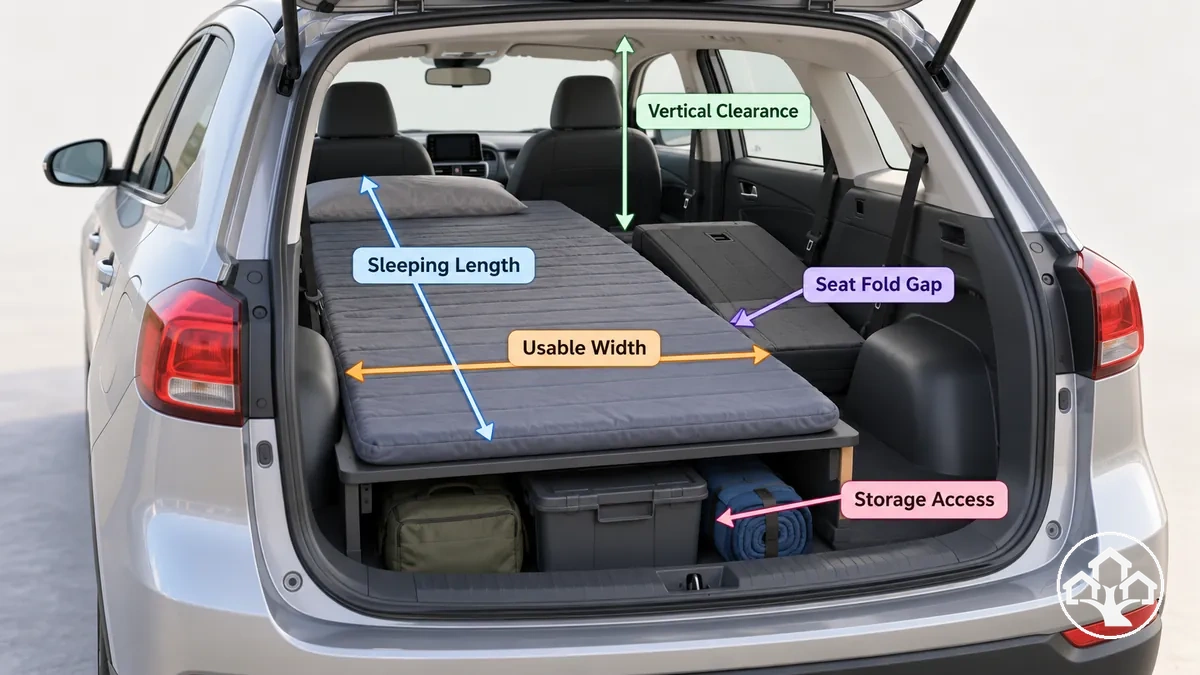
Seat-folding geometry, wheel arches, gaps, and deployed bedding can change usable geometry even when the underlying cargo area is unchanged.
For example, the same cargo area can provide less usable width where wheel arches intrude, less level sleeping length where folded seats leave a slope or gap, and less storage access when bedding occupies an access path.
The following measurements connect each physical dimension or obstruction to its practical fit implication.
- Sleeping length: Measure from the intended head position to the furthest usable foot position along the actual sleeping surface. The measured length indicates whether the planned body position fits without relying on space occupied by seats, doors, or other obstructions.
- Usable width: Measure the width at the narrowest points that the sleeping surface must pass through, including areas affected by wheel arches or interior trim. The limiting width determines how much of the apparent floor area can actually support the sleeping surface.
- Vertical clearance: Measure from the top of the deployed sleeping surface or bedding to the lowest relevant roof or interior obstruction. This clearance indicates how much room remains above the sleeping position after bedding thickness is included.
- Seat-folding geometry: Check the folded-seat angle, gaps between surfaces, and changes in height along the intended sleeping area. A persistent slope, gap, or step means the nominal floor length does not represent one continuous flat sleeping surface.
- Storage access: Measure the storage space that remains reachable with the sleeping surface fully deployed. Storage that can only be opened after dismantling the bed is not continuously accessible in the sleeping configuration.
- Movement and opening clearance: Check the remaining space around the sleeping surface where movement or access to stored items is required. If bedding or storage blocks the intended path or opening, the layout needs adjustment even when its individual dimensions fit.
Taken together, these interior measurements show whether the available geometry can accommodate the planned sleeping surface while keeping necessary storage reachable and movement practical.
Identify Access, Airflow, and Power Constraints
A car layout can fit physically and still be impractical if it blocks door access, hatch access, an airflow path, vehicle controls, or a charging point.
These operational setup constraints determine whether essential openings and functions remain accessible once sleeping and storage elements are in place.
An observed obstruction identifies the part of the layout that requires a design response rather than proving that the entire setup is suitable or unsuitable.

Check the layout in three groups: access constraints, airflow constraints, and power constraints.
Access checks identify blocked doors, hatches, exits, or controls; airflow checks identify window openings or ventilation paths obstructed by the layout; power checks identify unreachable charging locations or cable routing that interferes with movement.
These checks identify operational limits rather than complete ventilation or electrical solutions, because practical airflow and power access depend on the final configuration and operating conditions.
- Access constraints:
- If bedding or storage blocks the intended door or hatch access, the obstructing element requires repositioning so the necessary opening remains usable.
- If the layout restricts access to essential vehicle controls, the arrangement requires adjustment around those controls.
- Airflow constraints:
- If bedding, curtains, or stored items obstruct a planned window opening or ventilation opening, the available airflow path is reduced and the nearby layout requires adjustment.
- If large interior items interrupt the intended airflow path, their placement becomes a constraint that must be accounted for before the ventilation arrangement is finalized.
- Power constraints:
- If a charging point becomes inaccessible after the sleeping or storage layout is deployed, the surrounding equipment or storage position requires adjustment.
- If cable routing crosses a door opening or movement path where it can obstruct access or be snagged, the cable needs a different clear route.
For example, a sleeping footprint may fit the available floor area while a storage unit beside it blocks the hatch, covers part of a window opening, or prevents access to a charging point.
Physical fit has then been achieved, but the observed operational conflict still requires a layout change.
Identifying these constraints before committing to the arrangement keeps later access, airflow, and power choices tied to the actual interior configuration.
Arrange the Interior for Sleeping and Storage
Establish the sleeping footprint before assigning storage because both functions compete for the same interior space.
Define where the sleeping surface will sit in the night configuration, then preserve the access path and movement needed around it.
Storage zones should be assigned only after those fixed requirements are clear.
The exact arrangement can vary with vehicle shape, body position, seat configuration, and the volume of items being carried.

Separate fixed space from movable storage and consider how the interior layout changes between night configuration and daytime access.
In a compact car, placing storage first may consume part of the sleeping footprint or access path, forcing the storage to be repositioned once the sleeping surface is established.
Frequently used items should remain reachable in the configuration where they are needed, while movable storage can shift when changing between sleep mode and daytime use.
Follow the sequence below so storage is fitted around sleeping and access requirements rather than consuming them first.
- Establish the sleeping footprint: Position the intended sleeping surface within the fixed space available in the night configuration, accounting for the body position and seat arrangement that will actually be used.
- Preserve the access path: Keep the necessary door path and movement space clear around the sleeping footprint before assigning storage zones.
- Assign storage zones: Position frequently used items where they remain reachable during normal use and place occasional items in areas that do not compete with the sleeping surface or required access. Use movable storage where reconfiguration between daytime access and night configuration is necessary.
- Verify and adjust: Test the completed layout in both daytime and night configurations. If storage obstructs movement, essential access, or the sleeping footprint, reposition the movable elements before relying on the arrangement.
Create a Flat Sleeping Setup That Fits the Available Space
The sleeping setup should fit the measured space while keeping the support surface as flat and stable as the vehicle allows.
A flat sleeping surface needs enough body length, usable width, and headroom for the intended sleeping position without blocking necessary access.
The sequence moves from confirming fit to correcting seat slope and gaps, establishing stable support, and verifying that the finished arrangement still works within the car.
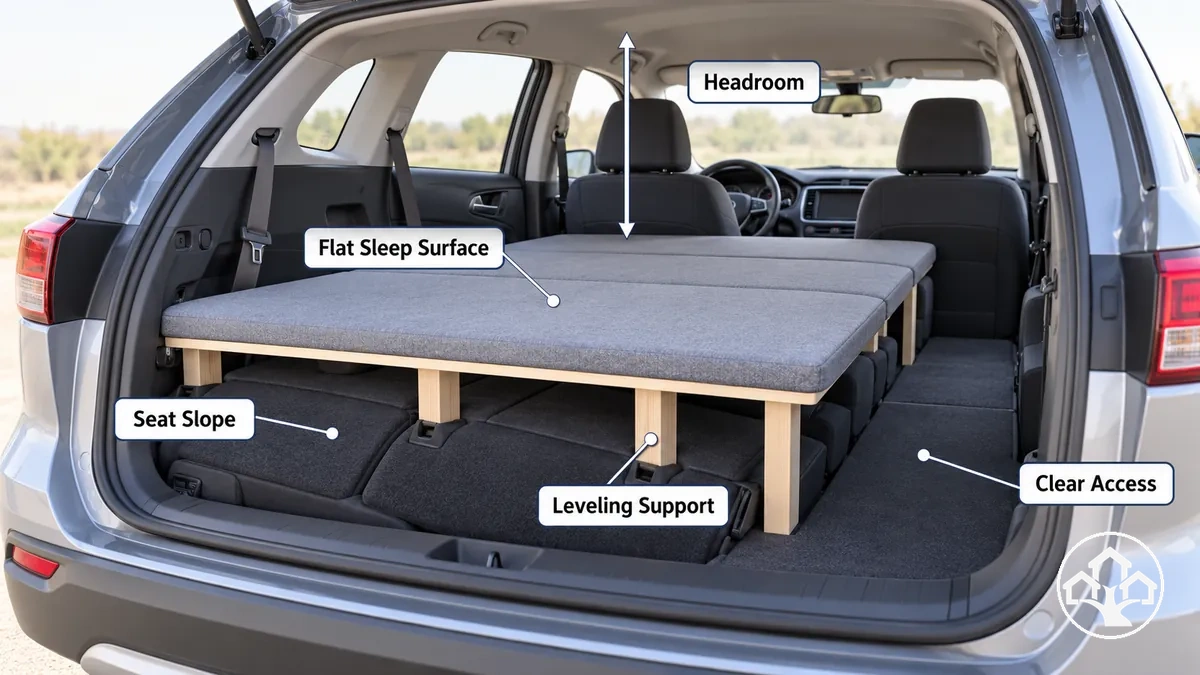
Seat slope, gaps between folded sections, uneven support points, and bedding thickness can change how well the sleeping surface functions even when it technically fits the available footprint.
A spacious-looking area with a persistent slope may still provide an uneven body position, while the same space can function more effectively when the geometry is leveled and supported without unnecessarily reducing headroom.
A reversible setup also allows the sleeping arrangement to return to its daytime configuration when entry, exit, or vehicle controls are needed.
- Confirm the sleeping position: Place the intended body position within the available footprint and verify that body length, usable width, and headroom fit the planned sleep surface. If the position conflicts with interior boundaries or access, adjust the orientation or footprint before adding support.
- Identify and level major slopes or gaps: Check the folded-seat area and adjoining surfaces for a seat slope, step, or gap that prevents a continuous sleeping plane. Add only the leveling support needed to create a flatter transition, and adjust the arrangement if the slope or gap remains pronounced.
- Establish stable support: Verify that the support points beneath the sleeping surface remain steady when normal movement is applied across the intended sleeping area. If a section shifts, rocks, or leaves part of the surface unsupported, reposition or stabilize the support before continuing.
- Add the sleep surface and recheck fit: Position the bedding or sleep surface on the supported plane and verify that its thickness still leaves usable headroom and does not introduce a new slope. If headroom becomes too restricted or the surface no longer lies evenly, adjust the support or bedding arrangement.
- Verify access and reversibility: Test entry, exit, essential vehicle controls, and the ability to return the interior to its daytime configuration. If the trial reveals blocked access, unstable support, or a persistent slope, adjust the reversible setup before relying on it for regular sleeping.
Organize Storage Around Access and Daily Use
Organize car-living storage by access frequency and containment needs, not simply by where an item physically fits.
Daily-access items should remain reachable in sleep mode, while occasional-use items can occupy less accessible storage zones.
Wet items, dirty clothing, and loose objects also need placement based on separation or secure storage requirements.
The useful storage location is therefore determined by how the item is used, contained, and reached in the tested layout.
Reachability changes when the sleeping setup is deployed, doors are opened, or seats move between daytime and night configurations.
A storage zone that works during daytime access may become blocked in sleep mode, so placement should be checked with the sleeping footprint in position.
For example, toiletries, charging cables, bedding, and dirty clothing could physically fit in one container, but toiletries and cables may need frequent access, bedding occupies more space during reconfiguration, and dirty clothing benefits from separate containment.
Grouping storage by use and containment keeps those different requirements from competing for the same access path.
- Daily-access items: Place frequently used items such as essential toiletries or charging cables in a storage zone that remains reachable without dismantling the sleeping setup. If opening that storage blocks a door path, interferes with seat movement, or requires moving the bed setup, reposition it closer to a clear access point.
- Occasional-use items: Place low-frequency items in less immediate storage areas where reduced reachability does not interrupt normal daily use. Their location can be farther from the main access path provided they do not obstruct the sleeping footprint, seat movement, or items needed more often.
- Wet and hygiene items: Separate wet items, hygiene items that require containment, and dirty clothing from clean bedding or other items that should remain dry. Use a contained storage area that can be accessed when needed without spreading moisture or soiling into adjacent storage zones.
- Items requiring secure storage while driving: Place loose or movable items where they can be secured against movement during driving rather than left in door paths, on seats, or across access areas. After arranging all four groups, verify that daily-access items still remain reachable in sleep mode without dismantling the sleeping setup.
Set Up Daily Living Systems Inside the Car
Daily living systems must coexist with the physical sleeping-and-storage layout rather than being added independently.
Airflow, moisture management, hygiene access, water and waste handling, and charging all use the same limited interior space and access paths.
Each system therefore needs to be positioned according to the available vehicle conditions without interfering with the functions already established.
The practical test is whether these systems can operate together during normal daily operation.
- Storage and ventilation
- Bedding or stored items beside a window can obstruct the available airflow path. Moving them may improve air exchange, but the replacement position must still leave exits, hygiene access and other openings clear. Damp items may also require separate containment.
- Water, waste and access
- Potable water and frequently used hygiene supplies need accessible, clean storage; grey water and other waste need separate containment and a disposal plan. A container that fits in the car can still make movement or facility-related routines impractical if it blocks a necessary path.
- Charging and movement
- A reachable charging point is not enough if its cable crosses a door opening or movement path. Reposition the device or route the cable clear of the path without blocking another essential function.
Recheck interactions together: weather, daily routine, facility access and device demand may change which position works. Solving one conflict should not create another.
System compatibility, rather than the quantity of equipment carried, is the key test for whether the daily living systems work with the established interior layout.
Set Up Airflow to Manage Humidity and Condensation
Airflow helps manage humidity and condensation by dispersing moisture that accumulates inside an occupied car, especially while sleeping.
Condensation is more likely when moisture builds up faster than it can be dispersed and interior surfaces are cold enough for water vapour to condense.
The result depends on moisture load, surface temperature, outside conditions, airflow, and vehicle configuration rather than on one factor alone.
Ventilation should therefore be adjusted according to the conditions and condensation signs observed in the actual car.
Window droplets, damp surfaces, or damp bedding indicate a need to check moisture buildup and airflow, but none of these signs proves a single cause.
Check whether a window opening or other available ventilation opening is restricted, whether stored items interrupt air exchange, and whether outside conditions are making interior surfaces colder.
The cause-and-response checks below connect observable conditions with practical adjustments without assuming that one ventilation setting will work in every climate.
- Moisture accumulating during occupied periods: If humidity and dampness increase while people are inside the car, check whether available openings are providing continuous airflow. Where practical for the conditions, increase unobstructed air exchange through the available window opening or ventilation opening and reassess whether moisture buildup decreases.
- Condensation appearing on windows: If droplets form on cold window surfaces, treat them as a condensation signal rather than proof of one cause. Check both the available airflow and the outside conditions, then adjust the usable openings or interior arrangement if air exchange is restricted.
- Airflow obstructed by the layout: If bedding, curtains, or storage placement blocks a window opening or interrupts the intended airflow path, the obstruction can reduce air exchange. Reposition the obstructing item where possible and observe whether ventilation through the available opening improves.
- Damp bedding or nearby surfaces: If bedding or interior surfaces remain damp, check for nearby moisture sources, restricted airflow, and contact with colder surfaces. Increase separation or airflow where the layout allows and reassess the area rather than assuming condensation has one fixed cause.
- Conditions changing with weather: If condensation becomes more noticeable as outside temperature or weather conditions change, reassess the ventilation setup for those conditions. A window opening or airflow arrangement that is adequate in one situation may need adjustment when moisture load, surface temperature, or outside conditions differ.
Use the observed humidity, condensation, dampness, and airflow conditions to guide incremental adjustments to the setup.
The goal is to improve moisture management for the current weather and vehicle configuration, not to assume that any single ventilation tactic will eliminate condensation.
Plan Hygiene, Water, and Waste Handling
A workable hygiene, water, and waste plan identifies how personal hygiene, potable water, toilet needs, waste containment, and routine vehicle cleanliness will be handled before they are needed.
Some needs can be supported with supplies carried inside the car, while others depend on facility access for refilling, washing, toilet use, or disposal.
The plan should therefore connect each need with its expected frequency, access condition, storage separation, and disposal requirement.
Set supply amounts according to the number of occupants, expected time between reliable refill or disposal opportunities, weather and personal needs. Carry enough potable water for planned drinking and other necessary use until the next confirmed refill, with an allowance for delays; do not assume a single quantity fits every situation.
Frequently needed supplies should remain accessible without disrupting the sleeping setup, while wet items, dirty clothing, waste, and potable water may require separate storage or containment.
Toilet and disposal arrangements also depend on whether suitable external facilities are available when needed.
Grey water and other waste should have a defined containment and disposal plan appropriate to the available facilities rather than being treated as an afterthought.
The checklist below tests whether each sanitation need has a usable supply, access point, separation method, or disposal plan.
For an overnight period with no immediate facility access, the setup should still provide for potable water, hand hygiene, toilet contingencies, and temporary waste separation until appropriate facility access becomes available.
This scenario tests whether the plan remains workable when external access is delayed rather than assuming facilities will always be nearby.
- Personal hygiene: Identify which personal hygiene needs must be handled inside the car and which depend on external facility access. Keep the supplies needed between facility visits reachable and verify that using them does not require unpacking unrelated storage.
- Potable water: Provide for drinking and other intended potable-water use according to the expected duration and refill opportunities. Store potable water separately from waste, grey water, dirty items, or other sources of contamination, and verify that the water remains accessible when needed.
- Hand hygiene: Identify how hand hygiene will be handled when a wash facility is unavailable. Keep the required supplies in an accessible storage area and verify that they can be used when needed without depending on immediate facility access.
- Toilet needs: Plan access to appropriate toilet facilities where available and define a contingency for periods when immediate facility access is not available. Any carried contingency supplies should remain contained and separated from potable water, clean bedding, and personal hygiene items.
- Waste containment: Provide separate containment for rubbish, hygiene waste, and dirty clothing where their condition requires separation from clean items. Verify that containers can remain closed or otherwise contained during storage and movement until disposal is available.
- Grey water and routine cleaning: Identify how grey water and routine vehicle-cleaning waste will be contained and where suitable disposal access will be found. Verify that the plan does not depend on releasing waste where no appropriate disposal option has been confirmed.
- Final readiness check: Test the plan against the expected period between facility visits. Confirm that potable water, personal and hand hygiene, toilet needs, waste containment, storage separation, and disposal planning remain covered if external access is temporarily unavailable.
Plan Power and Charging for Essential Devices
An essential-device charging plan should match the power requirement and charging frequency of genuinely essential devices with realistic charging opportunities and a fallback.
Frequent low-demand needs such as phone charging may be easier to support than occasional higher-demand portable electronics, but actual demand depends on the device and how often it is used.
Identify each essential function first, then match it to an available charging source with a compatible connector and suitable output rating. Verify the connection under the conditions in which charging will actually occur.
The plan should not depend on one charging opportunity that may be unavailable when the device needs power.
Source availability can change with driving time, access to external power, vehicle configuration, and the specifications of the device and charging source.
Accessory power may support portable electronics when the vehicle outlet and device ratings allow it. In many vehicles, charging accessories while the engine is off draws from the starter battery and prolonged use can leave too little charge to start the vehicle; check the vehicle instructions and use another verified source when necessary.
A fallback can be another verified charging opportunity, a separate compatible portable power source, or reduced non-essential device use until charging becomes available.
The table matches essential functions with suitable charging opportunities and fallbacks. Verify actual charging time and available capacity from the particular device and power-source specifications, rather than assuming an untested runtime.
| Device or function | Charging frequency or demand | Available source | Fallback implication |
|---|---|---|---|
| Phone and communication | Frequent charging based on daily use and remaining battery state | Compatible accessory power, external mains access, or another verified portable source | Keep an alternative charging opportunity available if the primary source cannot be used when needed |
| Navigation or other essential portable electronics | Demand depends on operating time and whether the device is used continuously | A compatible source available during driving or at a planned external charging point | Plan another usable source or conserve device use if the expected charging opportunity is unavailable |
| Rechargeable lighting used for daily living | Recharge according to use and remaining charge rather than assuming continuous availability | Compatible accessory power or another verified charging source | Recharge before the primary source becomes unavailable or retain another practical lighting option |
| Occasional higher-demand portable device | Less frequent charging but potentially greater demand per charging session | A source whose specifications match the device requirement | Delay non-essential use or use another verified source if the available source cannot support the device |
Charging phones and other living essentials is different from charging an electric vehicle for propulsion.
EV charging involves the vehicle's traction-battery charging system and is outside this essential-device charging plan.
Verify that the essential devices can be recharged through realistic available sources and that a fallback exists without relying on an unverified assumption about accessory power or the starter battery.
Test the Car-Living Setup Before Relying on It
Test the completed car-living setup under realistic conditions before depending on it as the default living arrangement.
The purpose of the trial is to reveal setup failures before they become daily problems and to replace assumptions about theoretical fit with observable evidence from actual use.
Use the sleeping, storage, airflow, hygiene, and charging arrangements as they would normally be used rather than testing each part in isolation.
Record concrete friction points so each failed verification can lead to a specific adjustment.
The verification pass should focus on observable results across sleep quality, access, airflow, condensation, hygiene practicality, storage stability, and charging.
A blocked exit, unreachable essential item, shifting storage container, visible condensation, or unavailable charging opportunity is a direct observation, while the reason for that result may require further checking.
Weather, duration, vehicle configuration, and routine can change how the same setup performs, so one symptom should not automatically be assigned a single cause.
The checklist tests actual use rather than whether the arrangement merely appears workable.
- Sleep quality: Use the setup for a representative sleeping period and note whether the sleeping position remains usable through normal movement and rest. If persistent slope, pressure, limited space, or another setup-related friction point disrupts the trial, check the sleeping surface and support arrangement and adjust the relevant part before the next test.
- Entry and exit: Verify that the intended entry and exit paths remain usable with the sleeping setup fully deployed. If bedding, storage, or another movable element blocks the route, identify the obstruction and reposition it before relying on that configuration.
- Access to essentials: Check whether frequently needed items remain reachable during the trial without dismantling major parts of the setup. If an essential item becomes inaccessible, reassess its storage position or the access path rather than assuming the overall layout must be rebuilt.
- Airflow and condensation: Observe airflow conditions and look for condensation, moisture, or damp surfaces during and after the occupied period. If these signs appear, check available openings, obstructions, outside conditions, and moisture sources, then adjust the airflow or nearby layout and test again.
- Hygiene practicality: Verify that personal hygiene, potable water, toilet contingencies, and waste handling can be managed with the planned supplies and available facility access. If a routine requires inaccessible supplies or creates containment or separation problems, adjust that part of the hygiene plan before the next trial.
- Storage stability: Observe whether stored items remain contained and stable during normal vehicle use and movement inside the car. If an item shifts, obstructs movement, or becomes difficult to access, check its placement and containment and make a targeted correction.
- Charging: Verify that essential devices can be recharged through the planned charging opportunity under the conditions of the trial. If the source is unavailable, inaccessible, or insufficient for the required use, revise the charging plan or provide a realistic fallback rather than relying on the same assumption.
One successful trial verifies only the conditions actually tested; it does not establish that the setup will perform the same way in different climates, locations, durations, or routines.
A later change in weather or daily use may reveal a friction point that did not appear during the first test.
Treat failed checks as evidence for specific corrective action, make the smallest relevant adjustment, and repeat the verification under representative conditions.
Run a Trial That Tests Sleep, Access, Airflow, and Charging
Run the trial by reproducing the actions the car-living setup is expected to support in normal use, not by simply sitting in the parked car briefly.
Convert the interior to sleep mode, use the sleeping position, enter and exit, retrieve essentials, observe airflow and moisture, and complete an essential-device charging attempt.
Perform these actions in their normal order so changes made for one function remain in place when the next function is tested.
The trial should reveal whether the completed arrangement continues to work as its different parts are used together.
An observable pass means the required action can be completed in the tested configuration without an obstruction or unexpected setup change.
A friction point is a concrete condition such as blocked entry, reduced reachability, unstable positioning, visible moisture, restricted airflow, or an unavailable charging source.
The likely cause may involve layout, storage placement, outside conditions, or source availability, so record the observation first and identify the adjustment only after checking the relevant setup condition.
The sequence below tests actual use from sleep-mode conversion through charging.
- Convert the interior to sleep mode: Put the seats, sleeping surface, bedding, and movable storage into the configuration intended for sleeping. Observe whether the conversion can be completed without blocking necessary space, entry, exit, or essential controls; record any obstruction as a friction point requiring an adjustment to the relevant movable element.
- Test the sleeping position: Lie down for a meaningful period that allows normal body position and movement to be reproduced. Observe whether the sleeping surface remains usable and whether slope, gaps, limited headroom, or shifting support becomes noticeable; if a problem appears, record the specific condition that needs adjustment.
- Test entry and exit: With the setup still in sleep mode, enter and exit through the intended route. Verify whether bedding, storage, or another element obstructs the path; if access is restricted, record which element creates the friction point rather than assuming the entire layout is unsuitable.
- Retrieve frequently used items: Reach for the essentials expected to be needed while the sleeping setup is deployed. Check their reachability without dismantling the sleeping surface; for example, a storage bin that is easy to reach during the day may become inaccessible once the sleeping surface is in place, indicating that its storage position needs adjustment.
- Observe airflow and moisture: Use the occupied setup long enough to observe the available airflow and any moisture or condensation signs around windows, bedding, or nearby surfaces. If airflow is restricted or dampness appears, record the location and conditions so the relevant opening, obstruction, or moisture-management arrangement can be checked.
- Complete essential-device charging: Connect an essential device to the planned charging source under the conditions in which that source is expected to be available. Verify whether charging can actually be completed without interfering with access or movement; if the source is unavailable or impractical, record the charging friction point and the need for a different opportunity or fallback.
- Record the trial result: Review only the concrete failures or inconveniences observed during the sequence, including blocked access, poor reachability, airflow or moisture problems, sleeping-position friction, or incomplete charging. Record the specific adjustment each observation indicates for the next trial rather than declaring the setup universally ready.
Correct Setup Mistakes Revealed by the Trial
A trial finding becomes useful when the observed mistake is tied to its consequence, a clear recognition cue, and a specific corrective direction.
Direct observations such as blocked access, unstable storage, an uneven sleeping surface, visible moisture, or unavailable charging can identify where the setup requires attention, but the underlying cause may still need checking.
Use the condition seen during the trial to narrow the likely setup problem rather than assuming that one symptom has only one cause.
Prioritize corrections that affect access, stability, airflow, moisture management, hygiene separation, or charging availability.
- Mistake: The sleeping area remains uneven after deployment. Consequence: The uneven sleeping surface can create persistent slope, gaps, or an unstable body position. Recognition cue: The same uneven area remains noticeable during the trial after bedding is positioned. Corrective direction: Check the underlying seat geometry and support placement, then adjust the leveling arrangement; if the unevenness cannot be corrected without losing necessary space or access, reconsider the sleeping layout.
- Mistake: Storage placement creates blocked access. Consequence: Entry, exit, controls, or frequently used items become harder or impossible to reach in the deployed configuration. Recognition cue: The obstruction appears only after the sleeping surface or storage is placed in its normal position. Corrective direction: Reposition the specific storage element or change its access orientation; if the required sleeping footprint and access path cannot coexist, treat the conflict as a layout constraint.
- Mistake: The setup leaves unstable storage during normal use. Consequence: Stored items shift, obstruct movement, or become less predictable to access. Recognition cue: A container or loose item moves from its intended position during the trial. Corrective direction: Change its placement or containment so it remains stable in the tested configuration, then repeat the movement and access check.
- Mistake: Airflow is restricted or moisture is not adequately managed. Consequence: Condensation, damp surfaces, or reduced air exchange can appear during occupied periods. Recognition cue: Moisture or condensation repeatedly appears near an obstructed opening, bedding, or another affected area during the trial. Corrective direction: Check available openings, nearby obstructions, storage placement, and outside conditions, then adjust the local airflow or moisture-management arrangement and observe the result again.
- Mistake: Hygiene items, potable water, dirty items, or waste are not adequately separated. Consequence: The hygiene setup becomes harder to use cleanly and efficiently during normal access. Recognition cue: The trial shows that retrieving one category requires moving or opening another category that should remain separated. Corrective direction: Reassign the affected storage zones or containment so clean, wet, dirty, and waste-related items remain appropriately separated while still reachable when needed.
- Mistake: Charging availability is assumed rather than verified. Consequence: An essential device cannot be recharged when expected or its cable interferes with normal access. Recognition cue: The planned source is unavailable, inaccessible, or impractical under the conditions reproduced during the trial. Corrective direction: Verify another realistic charging opportunity or fallback and adjust device or cable placement where necessary without assuming one change will solve every charging limitation.